A sewing machine can feel like a small “mystery factory”: fabric goes in flat, and a neat seam comes out the other side. The good news is that once you understand the anatomy—what each part does and how the stitch is formed—your machine becomes predictable, fixable, and far more enjoyable to use. In this guide, I’ll explain the core parts of a sewing machine, what they do, and how they work together to make a lockstitch (the most common home-machine stitch). Along the way, you’ll also see how these mechanics connect to practical choices like beginner-friendly models, common problems, and what features actually matter.

How a Sewing Machine “Makes a Stitch” (The Big Picture)
Most household machines create a lockstitch, which uses two threads: the upper thread (from the spool) and the lower thread (from the bobbin). When you press the foot pedal or start button, the motor drives a main shaft that times the needle, take-up lever, and hook/bobbin system so they meet at the right micro-moment. If that timing is even slightly off—or thread tension is unbalanced—you’ll see skipped stitches, looping, or thread breaks.
When I first started sewing garments, I assumed “better thread” would fix everything. In reality, 80% of my early issues came from threading mistakes (missing a guide) and mismatched needle/fabric. Understanding the anatomy turned troubleshooting from guesswork into a checklist.
Sewing Machine Parts and What They Do
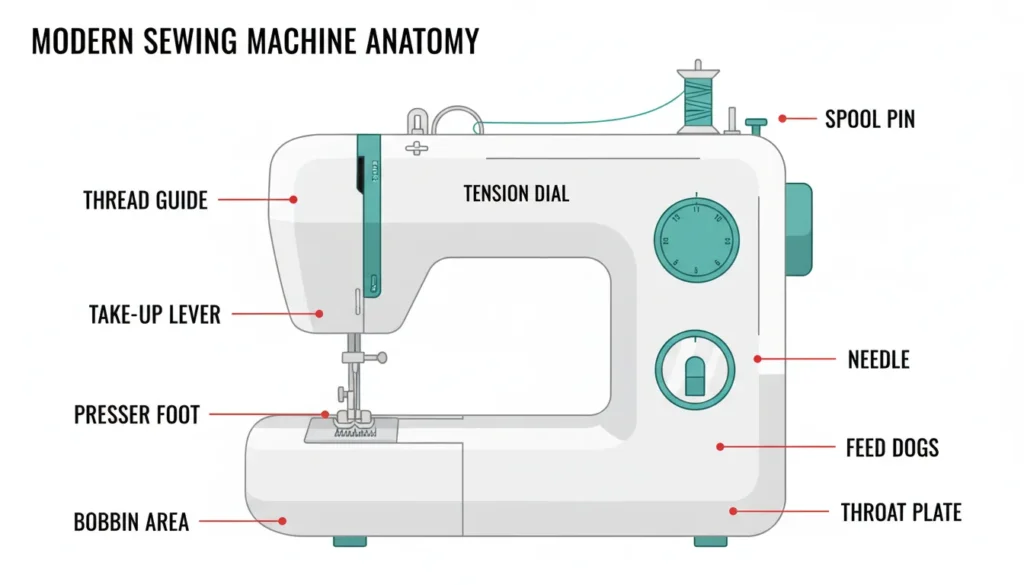
Upper Thread Path (Top of the Machine)
The upper thread path controls delivery and tension—basically, how smoothly thread feeds and how tightly it locks with the bobbin thread.
- Spool pin: Holds the thread spool; orientation matters for some threads (cross-wound spools often prefer a vertical pin with a spool cap).
- Thread guides: Keep thread aligned so it enters tension discs correctly and doesn’t snag.
- Tension dial/discs: Applies controlled resistance to the upper thread; too tight can pucker fabric, too loose creates loops underneath.
- Take-up lever: Pulls thread back up after each stitch, clearing slack so the stitch tightens cleanly.
Pro tip: If your stitches loop on the underside, it’s commonly an upper-threading or upper-tension issue—not a “bad bobbin.”
Needle System (Where Precision Matters Most)
The needle is the “tool tip” of the whole sewing machine. A wrong or dull needle can mimic major mechanical problems.
- Needle: Pierces fabric and carries upper thread down to the hook.
- Needle clamp: Holds the needle firmly; a slightly loose clamp can cause skipped stitches.
- Presser foot: Applies pressure to stabilize fabric as it feeds.
- Presser foot lever + pressure control (if available): Lifts the foot; pressure adjustment helps with knits, lofty fabrics, and slippery materials.
Needle basics you can rely on:
- Universal needles for general woven fabrics
- Ballpoint/stretch needles for knits
- Microtex/sharp needles for dense woven fabrics (like microfiber)
- Heavy/denim needles for thick seams
Feed System (How Fabric Moves)
A stitch only looks “even” if the fabric advances consistently.
- Feed dogs: The serrated teeth that rise, move, and drop to pull fabric through.
- Throat/needle plate: The metal plate with seam guides and needle hole; also supports fabric and controls needle clearance.
- Stitch length control: Changes how far feed dogs advance each cycle.
- Reverse lever/button: Reverses feed direction for backstitching to lock seams.
If you ever feel like the machine “eats” fabric at the start, it’s often the gap at the needle plate plus lightweight material. A straight-stitch plate or starting slightly in from the edge can help.
Bobbin Area (The Lower Thread System)
This is where many “mystery jams” happen, but it’s also easy to understand once you see the sequence.
- Bobbin: Holds lower thread.
- Bobbin case (or drop-in bobbin housing): Controls bobbin tension and positions thread for pickup.
- Hook (rotary or oscillating): Catches the upper thread loop and wraps it around the bobbin thread to form the lockstitch.
- Bobbin winder: Winds thread evenly onto the bobbin; uneven winding can cause tension surges.

The Lockstitch, Step by Step (In Plain English)
Here’s what happens in one stitch cycle:
- Needle goes down, carrying upper thread into fabric.
- Hook catches the loop formed behind the needle scarf.
- The hook pulls the loop around the bobbin, interlocking upper and lower threads.
- Take-up lever rises, removing slack and tightening the stitch.
- Feed dogs advance fabric the set stitch length.
When any part of that timing chain slips—needle not fully inserted, wrong needle type, lint in the hook race, or incorrect threading—the machine may skip stitches or jam.
How a Sewing Machine Works via animation
Quick Reference Table: Parts, Symptoms, and Fixes
| Part/System | What it controls | Common symptom when off | First fix to try |
|---|---|---|---|
| Upper threading + guides | Smooth thread delivery | Random thread breaks | Rethread with presser foot up |
| Tension discs/dial | Stitch balance | Loops under fabric | Increase upper tension slightly; rethread |
| Take-up lever | Removes slack | Birdnesting at start | Ensure thread is in take-up lever; hold thread tails |
| Needle type/condition | Fabric penetration + loop formation | Skipped stitches | New needle; match needle to fabric |
| Bobbin winding | Consistent lower tension | “Thump-thump” tension changes | Rewind bobbin evenly; don’t overfill |
| Hook/bobbin area cleanliness | Thread pickup timing | Jams, grinding feel | Remove lint; oil if manual recommends |
| Feed dogs + presser foot | Fabric movement | Uneven stitches, fabric not moving | Check presser foot down; clean feed dogs |
Common Sewing Machine Problems (And Why They Happen)
Thread bunching (“birdnesting”) under the fabric
This is frequently caused by the upper thread not seated in the tension discs—often because the presser foot was down while threading.
- Rethread completely with presser foot up
- Check bobbin is inserted in the correct direction
- Hold thread tails for the first 2–3 stitches
Skipped stitches
Usually a needle issue or a mismatch between needle and fabric.
- Replace needle (seriously—this fixes more than people expect)
- Use ballpoint/stretch needles on knits
- Slow down over thick seams
Fabric puckering
Often tension + stitch length + thread/fabric mismatch.
- Slightly reduce upper tension
- Increase stitch length on lightweight woven fabric
- Use a finer needle/thread pairing
Choosing a Sewing Machine: Beginner vs. Heavy-Duty vs. Computerized
A “best” sewing machine depends on what you actually sew: hemming jeans, quilting layers, or garment knits all stress the machine differently. For beginners, fewer features with reliable feeding and easy threading usually beats a complex stitch library.
What to prioritize first
- Easy threading (clear guides, good manual, decent lighting)
- Good feed (consistent stitch length, stable presser foot)
- One-step buttonhole (if you sew garments)
- Speed control (helpful for learning and precision)
- Availability of presser feet and service in your area

Are Old Sewing Machines Worth Keeping?
Often, yes—but for different reasons.
- Antique (often 100+ years): Value depends on rarity, condition, originality, and whether it’s a sought-after model.
- Vintage (20–100 years): Many have strong metal internals and a “feel” modern plastic machines can’t match.
- Practical reality: Parts availability and serviceability matter more than nostalgia if you plan to sew frequently.
Some classic models—like the Singer Featherweight 221—remain popular because they’re portable, smooth, and collectible. If you inherit an older sewing machine, a basic cleaning plus a professional tune-up can reveal whether it’s a daily driver or a display piece.
Sewing Machines vs. Digital Fabrication (Where xTool Fits In)
A sewing machine is unbeatable for seams, hems, and structural construction in fabric. But in modern making, many creators pair sewing with digital fabrication to speed up prep and add personalization.
In my workshop experience, the strongest combo is: cut accurately first, then sew efficiently. That’s where xTool’s ecosystem is relevant—especially for makers who do accessories, patches, labels, and small-batch product work.
- Laser cutting can help with precise pattern pieces (where material allows), templates, and repeatable shapes.
- Engraving/cutting is useful for tags, acrylic templates, packaging, and branding components.
- Apparel printing supports custom graphics before assembly.
If you’re exploring hybrid workflows, xTool’s product lineup and software are a good starting point, including xTool machines and tools, plus design support via xTool Studio for streamlining settings and repeatability. For safety when working with fumes and dust, it’s also worth reviewing guidance from NIOSH and maker-oriented workshop best practices like those from OSHA.
Internal reading that pairs well with sewing construction details: 7 Zippers Compared: Which Type Fits Your Sewing Project?.
Practical Maintenance: Keep Your Sewing Machine Predictable
A maintained sewing machine is a calm sewing machine. The routine is simple:
- Clean lint from feed dogs and the hook/bobbin race regularly (more often with fleece or batting).
- Change needles frequently (many sewists replace every project or 6–8 hours of sewing time).
- Use quality thread to reduce lint and tension variability.
- Follow your manual for oiling—some modern machines are designed to be oil-free.
If you only adopt one habit: rethread carefully and replace needles early. It prevents the majority of “my machine is broken” moments.
Conclusion: Make the Machine Feel Less Like Magic (and More Like a Tool)
A sewing machine isn’t mysterious once you know the anatomy: the upper path manages tension, the needle forms a loop, the hook catches it, the take-up lever tightens it, and the feed dogs move fabric forward. When something goes wrong, it’s almost always one of those systems—not “everything at once.” If you want to level up, pair this knowledge with a simple troubleshooting routine and you’ll spend more time sewing and less time seam-ripping.
FAQ: Sewing Machine Anatomy and Buying Questions
1) What sewing machine is best for beginners?
Look for reliable feeding, easy threading, speed control, and a one-step buttonhole. A simpler, sturdy machine is often easier to learn than a feature-heavy model.
2) How do I choose a sewing machine for my projects?
Match the machine to materials: knits benefit from better presser foot control and stretch stitches; denim needs torque and good needles; quilting benefits from throat space and even feeding.
3) What is the most trouble-free sewing machine?
Typically, models with straightforward mechanics, good manuals, and strong local service support feel “trouble-free.” Proper threading and regular needle changes matter as much as brand.
4) Is Brother or Singer a better sewing machine?
Both brands have excellent and average models. Compare the specific model’s feeding consistency, buttonhole performance, accessory availability, and service options rather than relying on the logo.
5) What are some common problems with Singer sewing machines?
Common issues reported across many machines (not just Singer) include tension misthreading, bobbin jams from lint, and skipped stitches from needle mismatch—usually fixable with setup and maintenance.
6) Are old sewing machines worth keeping?
Yes if they’re in good condition, serviceable, and fit your needs. Some vintage machines are durable daily sewists; others are better as collectibles depending on rarity and parts availability.
7) Which Singer models are most valuable?
Collectors often prize rare or iconic models—especially well-preserved Singer Featherweight variants—though value depends heavily on condition, completeness, and market demand.