You’ve got a Diamond Artz kit on the table, the canvas is sticky, and the tiny drills look like they’re plotting an escape. If you’ve wondered “What do I actually need?” or “How do I keep this from turning into a mess?”—you’re in the right place. I’ve started plenty of diamond painting projects where I rushed the setup and paid for it later with crooked rows, stray drills, and lint stuck in the adhesive. This checklist keeps your first session calm, clean, and satisfying from the first gem to the final seal.

What “Diamond Artz” Means (and Why Setup Matters)
Diamond Artz is a style of diamond painting: you place small resin “drills” onto a numbered, adhesive canvas to form a mosaic image. It’s simple to learn, but the results depend heavily on organization and lighting. The biggest beginner problems—missing drills, fuzzy adhesive, and misaligned sections—almost always come from skipping basic prep.
A good setup does three things:
- Keeps drills sorted so colors don’t mix.
- Protects adhesive so it stays tacky.
- Helps you place straighter lines faster (less rework).
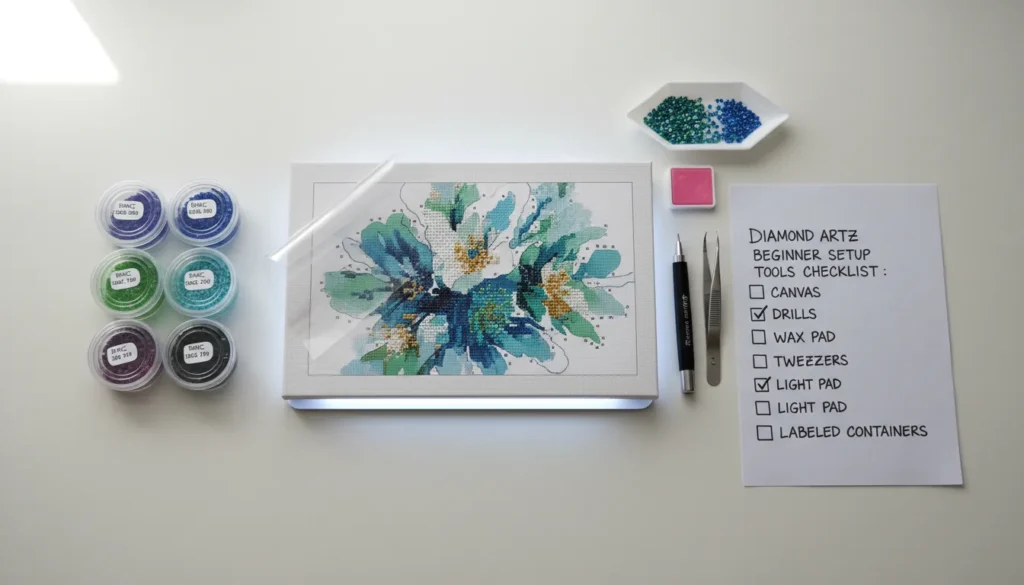
Tools Checklist (Must-Haves vs. Nice-to-Haves)
Most Diamond Artz kits include the essentials, but a few upgrades make the experience smoother. Here’s what I consider a practical starter kit you’ll actually use.
Must-haves (start here)
- Diamond painting pen (single placer) + wax/putty
- Tray (ridged) to line up drills
- Canvas + drills + reference chart
- Tweezers (for fixing misplacements and tight corners)
- Small containers (zip bags or screw-top pots for each color)
- Good light (desk lamp or bright overhead lighting)
Nice-to-haves (worth it if you continue)
- Light pad (improves symbol visibility; reduces eye strain)
- Multi-placer tips (faster filling on large color blocks)
- Release paper squares (better than repeatedly lifting the plastic film)
- Straightening tool/ruler (helps keep rows tidy)
- Sealer (optional; good for high-touch finished pieces)
| Item | What it does | Beginner priority |
|---|---|---|
| Wax/putty | Helps the pen pick up drills reliably | Essential |
| Tweezers | Corrects mistakes; places single drills precisely | Essential |
| Containers | Prevents color mixing and spills | Essential |
| Light pad | Makes symbols easier to read; speeds placement | High |
| Multi-placer | Places 3–10 drills at once on large blocks | Medium |
| Release paper | Protects adhesive; improves section control | Medium |
| Sealer | Adds surface protection after completion | Optional |
Step-by-Step: Diamond Artz Setup That Prevents Common Mistakes
1. Prepare your workspace (5 minutes)
Choose a flat surface where you can leave the project out. I’ve tried working on a couch tray—drills bounced, colors mixed, and I spent more time sorting than placing.
Do this:
- Wipe the table (dust and pet hair are adhesive enemies).
- Set a small “drill boundary” (a shallow box lid works) to catch spills.
- Put your light source in front and slightly above your dominant hand to reduce shadows.
2. Flatten the canvas (10–30 minutes)
Many canvases arrive slightly curled. A flatter canvas helps drills sit evenly and reduces popping later.
Options:
- Lay heavy books on the corners for 15–30 minutes.
- Roll it gently the opposite direction (don’t crease).
- Work in sections and keep the rest covered.
3. Sort drills before you start (the “no regrets” move)
Open only a few colors at a time or sort everything upfront—both work, but mixing colors is the #1 beginner time sink.
A safe approach:
- Pick the first small area (top-left if right-handed; top-right if left-handed to avoid resting on adhesive).
- Identify the symbols/colors you’ll need for that area.
- Pour each color into a labeled container using the kit code (e.g., DMC number if provided).
If you need affordable organizers, this is also where deal-hunting helps—see Crafts Stores Near Me: 7 Ways to Find the Best Deals for practical ways to find storage, trays, and light pads without overpaying.
4. Section the adhesive (clean edges, less lint)
Peel back only the portion you’ll work on for the next 20–40 minutes. The rest stays covered.
Pro tip I use: swap the plastic film for release paper squares so you can lift and replace cleanly without static cling.
5. Place drills with consistent pressure and alignment
- Tap the pen into wax lightly—too much wax causes slipping and residue.
- Shake drills in the tray until they flip right-side up.
- Place drills gently; then press the finished section with a clean roller or book.
If rows start drifting:
- Nudge them back with tweezers before moving on.
- Check alignment every few minutes—small corrections beat big repairs.
Timing & Effort: What Beginners Can Expect
Diamond Artz is relaxing, but it’s not instant. Time depends on canvas size, detail level, and whether you use multi-placers.

Use these ranges to plan:
- Short sessions (20–40 minutes) keep it enjoyable and prevent hand fatigue.
- Longer sessions benefit from a wrist rest and brighter lighting.
Troubleshooting: Fast Fixes for the Most Common Issues
Adhesive isn’t sticky anymore
- Lightly press with a clean cloth to remove dust.
- If a spot is truly contaminated, use a tiny amount of diamond painting adhesive (not random glue) and let it get tacky.
Drills “pop” or lift after placing
- Make sure they’re seated flat; press/roll the area.
- Check if the canvas is curled—flatten again.
- Avoid over-sealing early; seal only when complete.
Symbols are hard to read
- Increase lighting or add a light pad.
- Work in smaller sections.
- Take a photo and zoom in if your eyes need a break.
Finishing Your Diamond Artz: Seal, Frame, and Care
When the last drill is down, do a final press with a roller or book. Sealing is optional, but useful if the piece will be handled often or hung in a high-traffic area.
Finish options:
- Frame under glass (great protection, no sealer needed).
- Seal + frame without glass (matte or glossy finish depending on sealer).
- Mount on foam board for a clean, lightweight display.
If you’re the type who likes collectible crafts and display pieces, you may also enjoy the care mindset in Gold Cups: Myth-Busting Facts, Value, and Care—different craft, same principle: protect the finish and avoid harsh cleaners.
Optional Upgrade: Designing Custom Diamond Artz-Style Projects (xTool Angle)
If you fall in love with the “place-by-number” rhythm, the next step many makers explore is custom crafting—creating personalized patterns, labels, or gift packaging that matches the finished piece. In my workshop, machines can help with the supporting parts of diamond painting: clean storage labels, framed backboards, and custom display plaques.
For example, xTool’s ecosystem (like xTool Studio for designing and repeatable settings) is often used by crafters to create:
- Engraved nameplates for framed diamond art
- Cut-to-size backing boards and mats
- Custom storage labels for drill organization
To research safe practices and material handling for maker equipment, start with established guidance like OSHA guidance and product-specific safety documentation. For broader crafting techniques and community standards, Craft Industry Alliance is a solid industry resource, and for adhesive/chemical handling basics, consult NIOSH references.

Quick Diamond Artz Beginner Checklist (Print-Friendly)
- Clean, flat workspace + bright light
- Canvas flattened; only peel small sections
- Drills labeled and contained (no open piles)
- Light wax use; reload often
- Check alignment every few rows
- Press/roll finished areas
- Finish with frame (glass) or seal + frame
FAQ: Diamond Artz Beginner Questions
1. What’s the fastest way to start a Diamond Artz kit without making a mess?
Sort only the colors for your first section into labeled containers, and peel back a small area of protective film at a time.
2. Do I need a light pad for Diamond Artz?
Not required, but it helps a lot with small symbols, darker canvases, and longer sessions.
3. Should I seal my Diamond Artz when finished?
Only if it will be handled often or framed without glass. Under glass, sealing is usually unnecessary.
4. Why won’t my pen pick up drills?
You likely need fresh wax/putty, or you loaded too much and it’s slipping. Use a small amount and refresh often.
5. How do I keep drills straight?
Work in small sections, correct drift early with tweezers, and press the area flat before moving on.
6. What should I do if I spill drills?
Don’t panic—use a folded paper crease to funnel them back into a container, and check for color mixing before pouring.
Conclusion: Your First Diamond Artz Session, Done Right
By the time you place your first few rows, Diamond Artz stops feeling fiddly and starts feeling meditative—especially when your colors are organized and your canvas stays clean. I’ve found that a calm setup beats any “speed tip,” because it prevents the mistakes that steal your momentum. Try this checklist on your next session, then tweak it to match your space and rhythm.