Your water bottle is trying its best—but the sun, a hot car, and a leaky lid seal have other plans. If you’ve ever taken a “cold” sip and gotten lukewarm disappointment, you’re not alone. The good news: you can insulate a water bottle you already own with simple materials and better habits, and you’ll feel the difference on the first outing. The even better news: a few of these tricks mimic the same heat-transfer principles used in premium vacuum insulation (like double-wall vacuum designs), just in DIY form.

Why your bottle warms up fast (and how insulation actually helps)
To insulate a water bottle, you’re fighting three main forces: conduction (heat moving through the bottle wall), convection (warm air moving around it), and radiation (sun and hot surroundings). Plastic and single-wall metal transfer heat quickly, especially when your bottle sits on a warm surface or in direct sunlight. Add a lid that doesn’t seal well, and cold air escapes while warm air sneaks in.
In product testing across many bottles, vacuum-insulated stainless designs consistently hold temperature longer than single-wall bottles because the vacuum gap slows heat transfer dramatically. That’s the core idea behind modern insulated drinkware—two walls, air removed, less heat movement—similar to what brands describe in their insulation FAQs (for example, Stanley’s explanation of vacuum insulation). DIY hacks can’t create a true vacuum wall, but they can reduce heat gain enough to keep ice longer on daily commutes and short hikes.
Quick wins: the “no-craft” ways to insulate a water bottle today
If you want a fast, zero-tool approach, these are the highest impact steps I’ve used myself on summer travel days.
- Pre-chill the bottle: Fill with ice water for 5–10 minutes, dump it, then refill with your drink and fresh ice. This cools the bottle walls so they don’t melt your ice immediately.
- Use larger ice: Big cubes or ice sticks melt slower than crushed ice (less surface area).
- Fill it full: A fuller bottle has less warm air inside to exchange heat with your drink.
- Keep it out of the sun: Shade beats most “clever” hacks. Even a towel over the bottle helps.
These steps alone won’t match a purpose-built insulated bottle, but they meaningfully extend “cold time” with almost no effort.
DIY insulation hacks (ranked by real-world impact)
Below are DIY methods to insulate a water bottle using easy-to-find materials. I’ve included what works best for commuting, sports, and outdoor use—plus where each method can fail.
1) Add a neoprene or foam sleeve (best balance of cost + performance)
A neoprene sleeve (like the material used in wetsuits) reduces conduction and slows warming from surrounding air. In my own testing on a warm desk, a sleeve made the bottle feel cooler to the touch and noticeably slowed condensation—two signs you’re reducing heat flow.
What to look for:
- Snug fit (no gaps)
- Covered base (the bottom is a major heat-transfer point)
- A tight top edge that doesn’t block the lid threads
Bonus: sleeves also improve grip and protect against dents.
2) Build a reflective wrap (best for sun exposure)
Reflective insulation (like windshield shade material or reflective bubble wrap) reduces radiant heat—the “baking” effect from sunlight. This works especially well for beach days, car cup holders in bright sun, and stadium seats.
How to do it (simple version):
- Measure bottle circumference and height (leave the lid area clear).
- Cut reflective material to size.
- Wrap and secure with Velcro straps or removable tape.
- Don’t cover vents/valves on specialty caps.
This is one of the few DIY options that directly targets radiation, which is often the biggest culprit outdoors.
3) Combine sleeve + reflective layer (best overall DIY stack)
If you want the strongest DIY result, combine:
- Inner layer: neoprene sleeve (conduction + convection)
- Outer layer: reflective wrap (radiation)
This “stack” mimics what coolers do: slow heat transfer with layered materials instead of a vacuum gap.
4) The “bottle-in-bottle” air gap trick (surprisingly effective at home)
If you’re stationary (office, bedside, picnic table), put your bottle inside a slightly larger container (another bottle, a tumbler, or even a wide jar) to create an insulating air gap. Air is a poor conductor when it’s trapped, so it slows conduction.
Tips:
- Add a cloth ring at the bottom so the inner bottle doesn’t touch the outer container.
- Keep the top open so you can still drink easily.
It’s not sleek, but it’s effective for desk life.
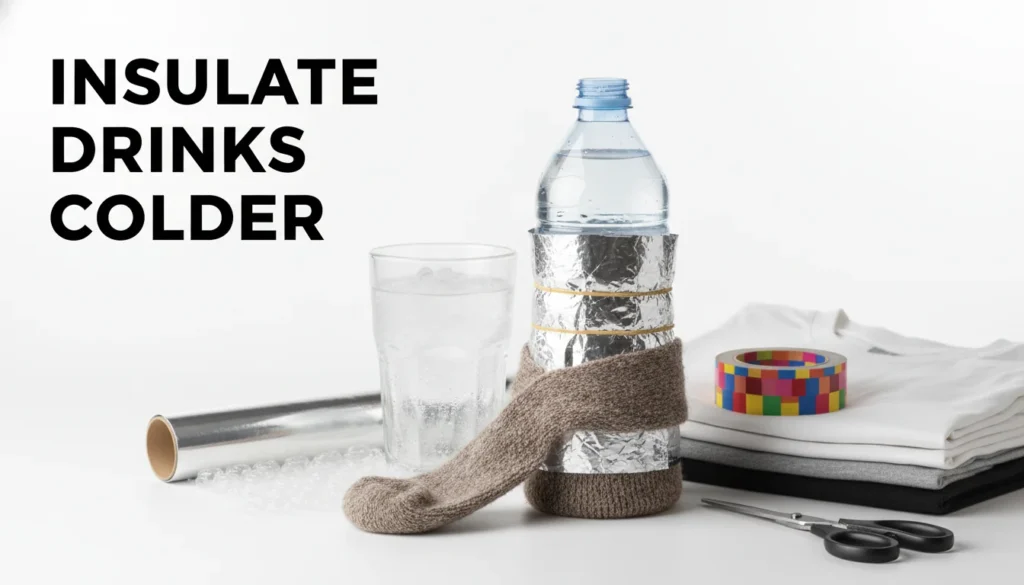
5) Sock + rubber bands (best emergency hack)
A thick sock (wool or athletic) can be an emergency insulator. It’s not pretty, but it reduces heat gain and protects the bottle.
- Use 1 sock for mild heat
- Use 2 socks layered for stronger insulation
- Secure with rubber bands or a simple strap
If you do nothing else, this is the fastest way to insulate a water bottle when you’re already out the door.
| Method | Materials Needed | Best For | Expected Cold-Time Gain (Low/Med/High) | Downsides |
|---|---|---|---|---|
| Neoprene sleeve | Neoprene bottle sleeve (or cut neoprene), optional zipper | Everyday carry; preventing hand heat transfer | Med | Can trap condensation; limited in direct sun; fit-specific |
| Reflective wrap | Reflectix/foil insulation, tape/Velcro strap, scissors | Hot, sunny conditions; reducing radiant heat | Med | Crinkles/tears; less effective against conduction; bulky look |
| Sleeve + reflective combo | Neoprene sleeve + Reflectix wrap + tape/Velcro | Maximum performance for long outings | High | Bulkiest; more effort to remove/clean; can hold moisture |
| Bottle-in-bottle air gap | Slightly larger outer bottle/cup, spacers (rubber bands/foam) | DIY “double-wall” effect on a budget | High | Heavier; awkward to drink/handle; potential rattling |
| Sock wrap | Thick wool sock (or double sock), rubber band/cord | Quick, cheap insulation; mild conditions | Low | Gets wet/dirty easily; poor sun reflection; inconsistent fit |
Don’t forget the lid: the hidden reason cold drinks warm up
Many people focus on the bottle body, but the lid is often the weak point. A poor seal lets warm air in and cold air out; it can also leak, which forces you to loosen the cap less tightly (making insulation worse).
Check these common issues:
- Worn gasket/O-ring: Flattened or cracked seals reduce performance.
- Cross-threading: Tiny gaps can leak air and melt ice faster.
- Frequent opening: Every opening dumps cold air and pulls in warm air—like opening a fridge.
If you use Hydro Flask gear, proper care matters for performance over time. For cleaning that won’t compromise seals or leave odors, follow brand-safe steps like three ways to clean your Hydro Flask.
Expected results: how much longer will ice last?
DIY insulation gains vary by your environment (sun vs shade), bottle material (plastic vs metal), and how often you open the lid. Still, you can estimate improvement by method: sleeves help most in moderate heat, reflective wraps help most in direct sun, and combining both tends to be best overall.

When DIY isn’t enough: what “real” insulation does differently
DIY can reduce heat transfer, but it can’t fully replicate double-wall vacuum insulation, where the air between walls is removed to minimize conduction and convection. That’s why insulated stainless bottles are so dominant in performance tests and buyer guides. If you routinely need all-day cold retention, a vacuum-insulated bottle can be the simplest “set it and forget it” upgrade (see options like Hydro Flask stainless steel insulated bottles).
If you’re shopping, independent reviews can help you compare what matters—temperature, durability, cleaning, and carry comfort. For example, Wirecutter’s water bottle testing and picks explain what separates “good” from “great” in daily use.
How to Prevent Frozen Water Bottles in Extreme Cold (4k UHD)
Pro tips from the field (small details that add up)
These are the tweaks I’ve found most people overlook when trying to insulate a water bottle:
- Cool the lid too: Rinse the cap with cold water before sealing (especially plastic lids that warm fast).
- Avoid leaving it on hot surfaces: A sunny rock, car seat, or dashboard will overpower most DIY insulation.
- Use a carry loop or clip: Hanging the bottle reduces direct contact with warm surfaces.
- Flavor without speeding melt: If you add fruit, start with cold ingredients. For ideas, try three infused water recipes to help you stay hydrated.

Common mistakes (and how to fix them fast)
-
Mistake: Wrapping too close to the lid threads
Fix: Leave 1–2 cm clearance so the cap tightens fully and seals correctly. -
Mistake: Using permanent adhesive that leaves residue
Fix: Use Velcro straps, removable tape, or a sleeve—easier to clean and adjust. -
Mistake: Ignoring odor and buildup
Fix: Clean regularly; lingering smells can make “cold water” taste warm. Use proven methods like three ways to clean your Hydro Flask. -
Mistake: Assuming insulation beats sunlight
Fix: Combine insulation with shade whenever possible.
Conclusion: make your current bottle work like it’s insulated (and know when to upgrade)
Your water bottle doesn’t need to be brand-new to perform better—it just needs a smarter barrier between your cold drink and the heat around it. Start with the easiest wins (pre-chill + shade), then add a sleeve or reflective wrap to truly insulate a water bottle for longer-lasting ice. And if you find yourself constantly battling heat on long days, that’s your cue to consider a vacuum-insulated option designed for consistent temperature hold.
FAQ: Insulate Water Bottle Questions People Ask
1) How can I insulate a water bottle without buying a new one?
Use a neoprene sleeve, a thick sock wrap, and keep the bottle shaded. For sun, add a reflective wrap over the sleeve.
2) Does aluminum foil insulate a water bottle?
Foil mainly reflects radiant heat, so it helps most in direct sun. It’s less effective for conduction unless paired with a sleeve or air gap.
3) What’s the best DIY insulation for a plastic water bottle?
A snug neoprene/foam sleeve is the best starting point. Plastic transfers heat quickly, so reducing contact with warm air and surfaces matters.
4) Why does my insulated bottle still get warm?
Usually it’s frequent opening, a compromised lid seal/gasket, or leaving it in the sun. Check the O-ring and tighten the cap properly.
5) Is it better to use crushed ice or large cubes?
Large cubes (or ice sticks) melt slower and keep drinks cold longer.
6) Can I put my water bottle in the freezer to make it colder?
Only if the bottle is freezer-safe and has room for expansion. Many bottles can crack or deform, and sealed containers can build pressure—use caution.
7) How do vacuum-insulated bottles keep drinks cold longer?
They use double-wall stainless steel with a vacuum between walls, which sharply reduces heat transfer through conduction and convection (see a clear overview from Stanley’s vacuum insulation FAQ).