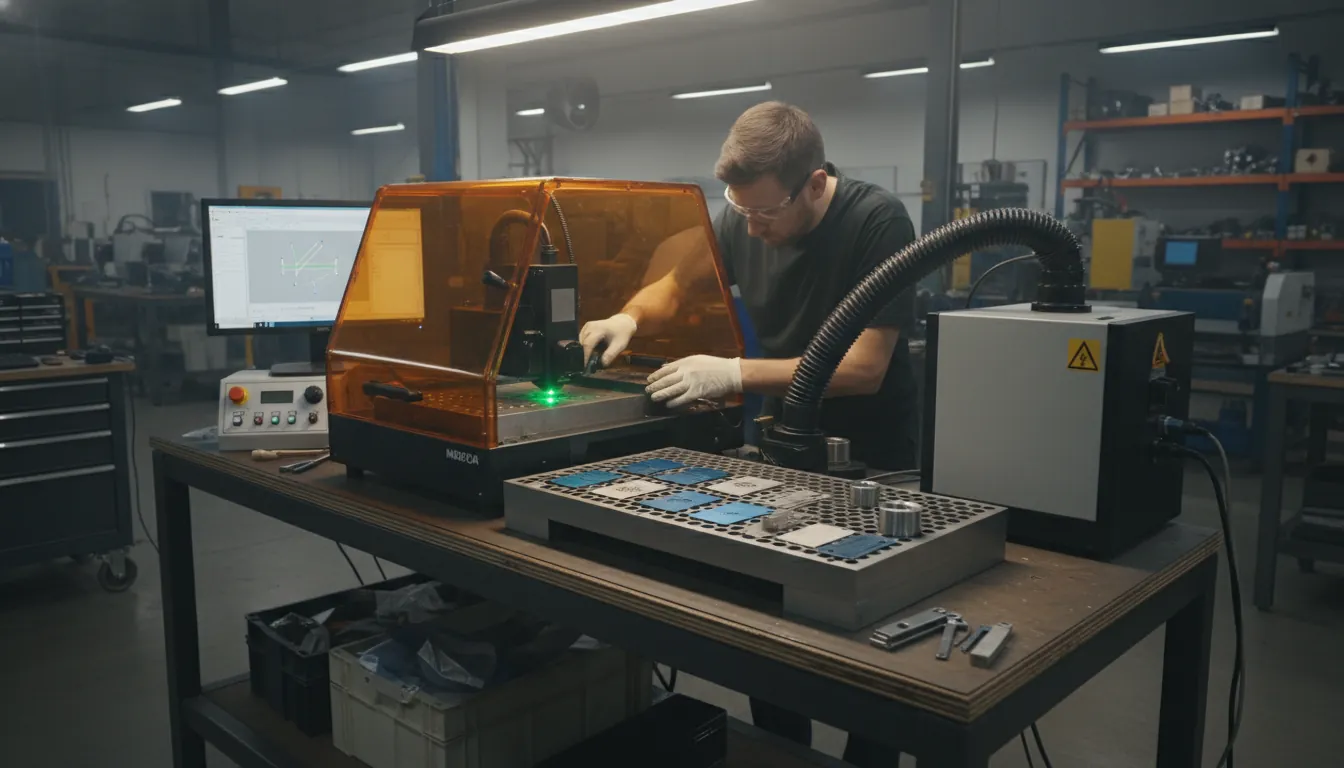
A mopa laser is like a “heat dial” for metal and certain plastics: you’re not just turning power up or down—you’re shaping the pulse itself. If you’ve ever tried to mark stainless and ended up with a dull gray instead of crisp black (or wanted color but got burn marks), you’ve met the real problem: pulse control. In my own testing on stainless business cards and anodized aluminum tags, switching to MOPA-style pulse tuning was the difference between “acceptable” and “sellable.” This guide breaks down what a mopa laser is, why it’s different from standard fiber, and how to buy and run one without expensive surprises.

What Is a MOPA Laser (and why people pay more for it)?
MOPA stands for Master Oscillator Power Amplifier—a laser architecture that separates pulse generation (oscillator) from power boosting (amplifier). In practical shop terms, a mopa laser gives you adjustable pulse duration (often ~2–500 ns depending on source), plus a wide range of frequency control. That extra control lets you manage heat input far more precisely than many fixed-pulse fiber systems.
Compared with “classic” Q-switched fiber, MOPA isn’t just about more wattage—it’s about how the energy arrives at the surface. That’s why MOPA is widely used in traceability marking (consistent contrast), fine detailing, and specialty results like black marking on aluminum or color on stainless (when the material and parameters cooperate). For a deeper definition and parameter overview, see xTool’s academy guide: What Is MOPA Laser: All You Need to Know.
MOPA Laser vs Fiber vs CO2 vs Diode: What’s actually different?
You’ll see “fiber laser” used as an umbrella term, but a mopa laser is typically a type of fiber laser with variable pulse width. That nuance matters because pulse width strongly affects:
- Heat-affected zone (HAZ) and edge quality
- Oxidation/annealing behavior (color potential on stainless)
- Plastic foaming vs burning
- Contrast on anodized and bare metals
| Laser Type | Typical Wavelength | Pulse Control | Best Materials | Typical Use Cases |
|---|---|---|---|---|
| MOPA fiber | ~1064 nm | Adjustable pulse width | Metals, some plastics | Color/black marking, fine engraving |
| Q-switched fiber | ~1064 nm | Fixed pulse | Metals | Deep engraving, general marking |
| CO2 | 10.6 µm | Fixed | Wood, acrylic, leather, glass | Cutting and engraving non-metals |
| Diode | ~450 nm or ~810–980 nm | Limited | Wood, leather, coated metals | Hobby engraving, light marking |
Key takeaway: If your core workload is wood/acrylic cutting, CO2 wins. If your core workload is metal marking/engraving and you want maximum control (especially for color/contrast), a mopa laser is often the best fit.
Authoritative references on laser-material interaction and wavelengths:
- SPIE—Lasers & Optics (industry research and fundamentals)
- NIST (measurement standards and materials/optics references)
- The Laser Institute (ANSI laser safety resources) (laser safety education and standards context)
What a MOPA Laser is best at (real-world applications)
A mopa laser shines in jobs where surface finish and thermal control matter as much as speed. The most common “why MOPA?” use cases I see in production and maker shops include:
- Color marking on stainless steel (annealing/oxide-layer effects; results vary by alloy and polish)
- Deep black marking on anodized aluminum (high contrast without overburning)
- Crisp QR codes and Data Matrix codes for traceability (medical, automotive, electronics)
- High-detail jewelry and small parts (fine line control with minimal melt)
- Selective marking on plastics where you want foaming/light marks rather than charring
If you’re focused specifically on metal results and machine selection, this buyer guide is a helpful companion: Metal Laser Engraving Machines.
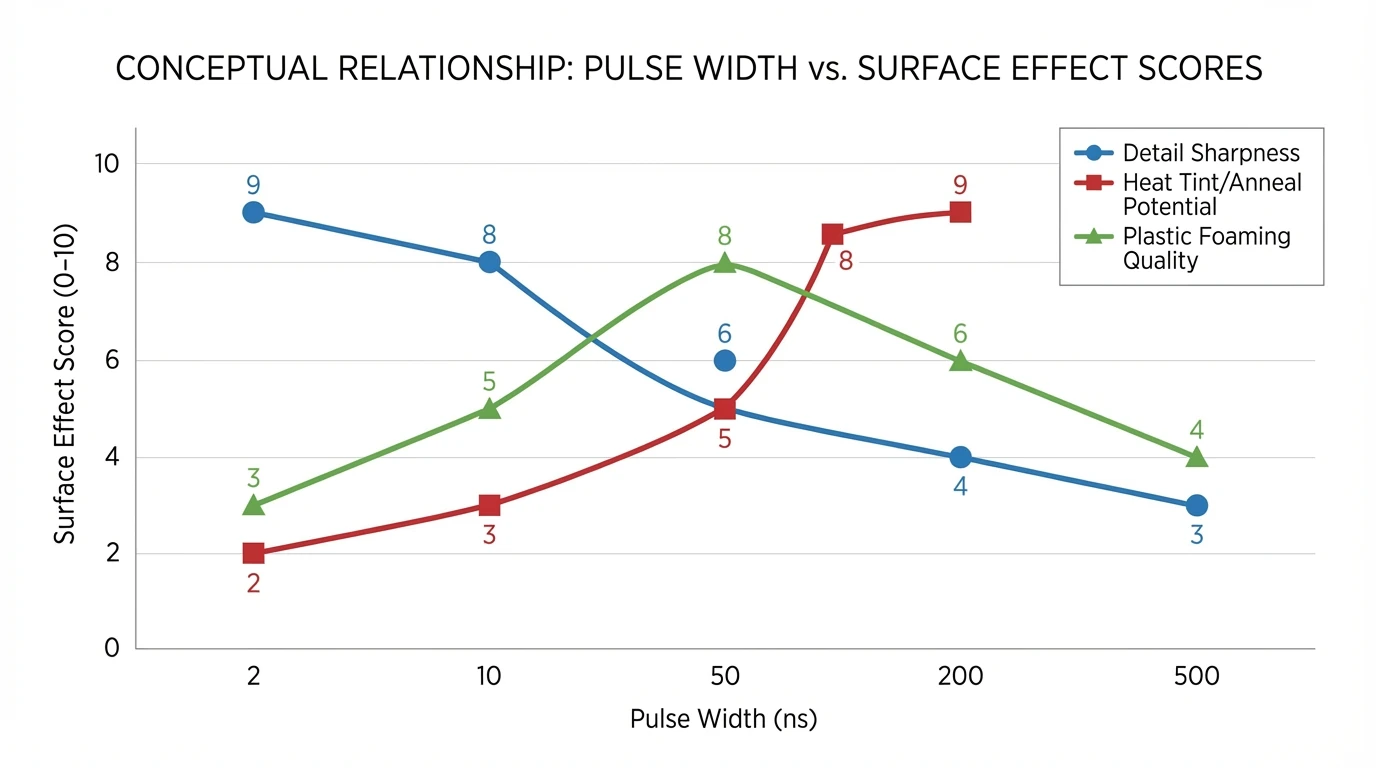
The 5 settings that matter most on a MOPA laser (and what they change)
Most mopa laser workflows come down to balancing energy, time, and heat. These are the levers you’ll use daily:
-
Pulse width (ns)
Short pulses usually reduce heat spread and can sharpen details; longer pulses can increase thermal effects useful for annealing/contrast. -
Frequency (kHz)
Higher frequency can smooth fills but can also add heat; lower frequency can deepen bite per pulse. -
Power (%)
Not just “more is better.” Too high can cause burrs, melt, or rough texture. -
Speed (mm/s)
Controls dwell time; slow can darken/deepen but risks heat accumulation. -
Hatch settings (line spacing/angle/passes)
Impacts uniformity, texture, and perceived darkness.
In my own tests on stainless, I got the most repeatable color patches by changing pulse width and frequency first, then fine-tuning speed—power last. It’s counterintuitive if you’re used to diode/CO2, but MOPA’s “secret sauce” is pulse shaping, not brute force.
Common MOPA laser mistakes (and how to fix them fast)
Even a great mopa laser will disappoint if your process is off. Here are the issues I see most often, plus quick corrections.
-
Color looks “muddy” on stainless
Polish level and alloy matter. Clean thoroughly, reduce contamination, and test smaller hatch + controlled heat (pulse width/frequency). -
Black marking on anodized aluminum turns brown
Back off heat accumulation: increase speed, adjust frequency, and reduce overlap (hatch). -
Edges look rough or raised
Too much energy density. Increase speed, reduce power, or change focus slightly (test on scrap). -
Inconsistent results between sessions
Check lens cleanliness, stable focus distance, and consistent material batches/coatings.
Safety note: avoid materials that release toxic fumes (e.g., PVC and certain resins). If you’re uncertain, verify the exact material composition and use proper ventilation and filtration per recognized safety guidance (see The Laser Institute (ANSI laser safety resources)).
How to choose a MOPA laser: a practical buying checklist
A mopa laser purchase should match your materials, throughput, and tolerance for setup time. Use this checklist to avoid underbuying (or paying for specs you won’t use):
1) Choose power based on workload, not hype
- Lower power (around 20–30W): excellent for marking, many color applications, small parts, light engraving
- Mid power (around 50–60W): faster fills, better throughput, more headroom for tough jobs
- High power (100W+): production speed and deeper engraving, but more cost and more heat management
2) Confirm pulse-width range and source reputation
Not all “MOPA” implementations behave the same. In production environments, stability and repeatability often matter more than peak wattage.
3) Pick the right field lens / work area
A larger field marks bigger items but reduces spot density; a smaller field boosts detail. Plan for the parts you actually sell.
4) Don’t ignore workflow features
Autofocus, camera alignment, rotary support, and enclosure/venting can change daily efficiency more than an extra 10W.
If you want a modern, creator-to-small-business option that combines MOPA capability with a broader materials workflow, consider the product details for the xTool F2 Ultra 60W MOPA & 40W Diode Dual Laser Engraver, especially if you regularly switch between metal marking and non-metal engraving tasks.
How to Color Mark 316 Stainless Steel with Monport GA30 MOPA Laser: Step-by-Step Tutorial
Recommended starter workflow: get results in 30 minutes (without guessing)
When you first power up a mopa laser, you’ll learn faster by running controlled grids than by tweaking one-off jobs. Here’s a simple approach I use when dialing in a new metal:
- Pick one material (e.g., 304 stainless, brushed) and clean it consistently.
- Run a parameter grid varying pulse width and frequency first.
- Lock the best 3–5 squares, then refine with speed and hatch spacing.
- Save presets by material + finish + lens (your future self will thank you).
This is also where a supportive ecosystem matters—software profiles, community-tested settings, and reliable accessories reduce the time from “unboxing” to “shipping products.”
Conclusion: Is a MOPA laser worth it?
A mopa laser is worth it when your business (or your craft) depends on controlled heat and repeatable surface effects—especially on metals and certain plastics. I’ve found MOPA’s pulse control is the difference between chasing settings for hours and running a stable recipe you can trust across batches. If your goal is higher-end metal marking, color/contrast work, or traceability-grade codes, MOPA is often the most direct path to professional results.
FAQ About MOPA Laser
1) What does MOPA mean in a MOPA laser?
MOPA means Master Oscillator Power Amplifier, a design that allows adjustable pulse duration and better control over how heat is applied to a material.
2) Can a MOPA laser do color engraving on stainless steel?
Yes, a mopa laser can produce color effects on many stainless finishes by controlling pulse width, frequency, and heat accumulation—results depend on alloy, surface prep, and repeatability.
3) Is a MOPA laser better than a standard fiber laser?
For applications needing pulse-width control (color marking, sensitive plastics, fine contrast), MOPA is often better. For straightforward deep engraving, a classic fiber can be sufficient.
4) What materials should I avoid with a MOPA laser?
Avoid materials that can emit toxic fumes (commonly cited examples include PVC and certain resins). Always verify the material and follow recognized laser safety guidance.
5) What power MOPA laser do I need for small business production?
Many small shops do well in the 30–60W range for speed and flexibility, depending on marking area, part size, and required throughput.
6) Can a MOPA laser cut metal?
Most MOPA fiber galvo systems are designed for marking and engraving, not cutting thick metal. Metal cutting typically requires dedicated fiber cutting systems with higher power and different motion/control setups.
7) How do I get consistent results with a MOPA laser?
Control the variables: clean optics, consistent focus, stable material sourcing, fixed presets per material/finish, and structured parameter grids when testing new substrates.